Query OMOP data in BigQuery
Categories:
Prior reading: Use cloud apps for analysis
Purpose: This document provides detailed instructions for querying OMOP data in BigQuery using two example queries.
Introduction
This tutorial shows some examples of querying OMOP data in BigQuery. The examples query the CMS SynPuf dataset, a public synthetic patient data in OMOP, and show how you can do basic visualizations.
Two example queries are shown:
- How to extract medical conditions based on ICD-10 codes
- How to extract drug treatments containing a specific molecule
How to run the example queries
To run the examples, you can import the following notebooks into a Verily Workbench notebook app. You can take the defaults when creating the app.
- extract_drug_treatments_from_a_molecule.ipynb
- extract_medical_conditions_from_ICD_codes.ipynb
- example_demographic_dashboard.ipynb
You can also add the example GitHub repo to a Workbench workspace, by adding this URL:
https://github.com/verily-src/workbench-examples.git. For step-by-step instructions, see Add a Git repository to a workspace.
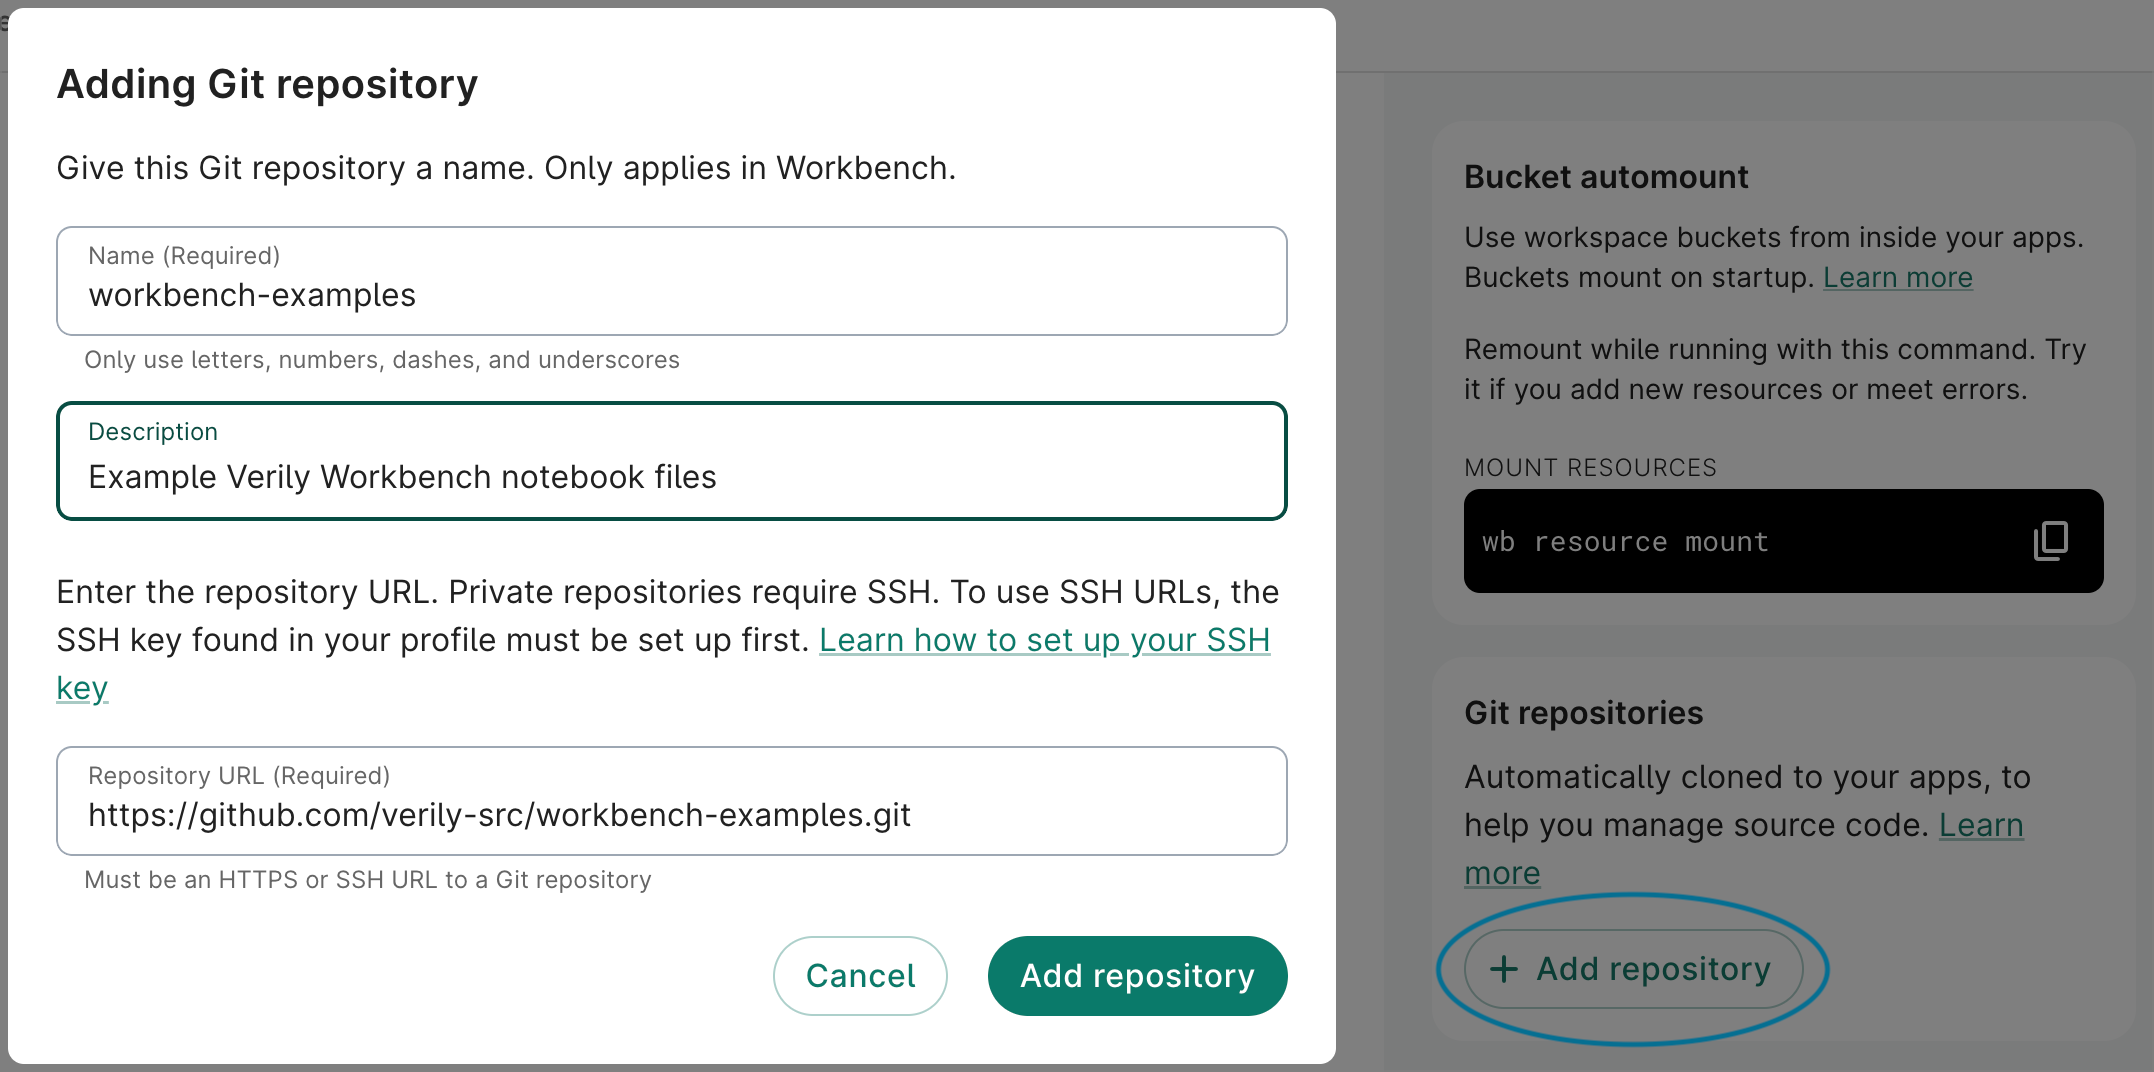
When you do that, the repo will be auto-mounted in any new notebook apps that you create,
and you will be able to find the notebook files in the
~/repos/workbench-examples/omop_examples/ directory in the notebook app's file system.
Imports and setup
The example queries and visualizations require the following imports:
import pandas as pd
from google.cloud import bigquery

import numpy as np
import seaborn as sns

# In JupyterLab, enable IPython to display matplotlib graphs.
import matplotlib.pyplot as plt
%matplotlib inline
from ipywidgets import interact, interactive, fixed, interact_manual
import ipywidgets as widgets
Optional: create a referenced resource for the CMS SynPuf dataset
If you're running this example in a Workbench workspace, you can create a referenced resource for the dataset. This gives it a more convenient name, and if you share your workspace with others, they will be able to access the workspace's defined resources as well.
The URI for the CMS SynPuf dataset is: bigquery-public-data.cms_synthetic_patient_data_omop. In a
Workbench workspace, you can define a referenced resource for this dataset like this, using
cms_synthetic_patient_data_omop for the Dataset ID and bigquery-public-data for the Project ID:
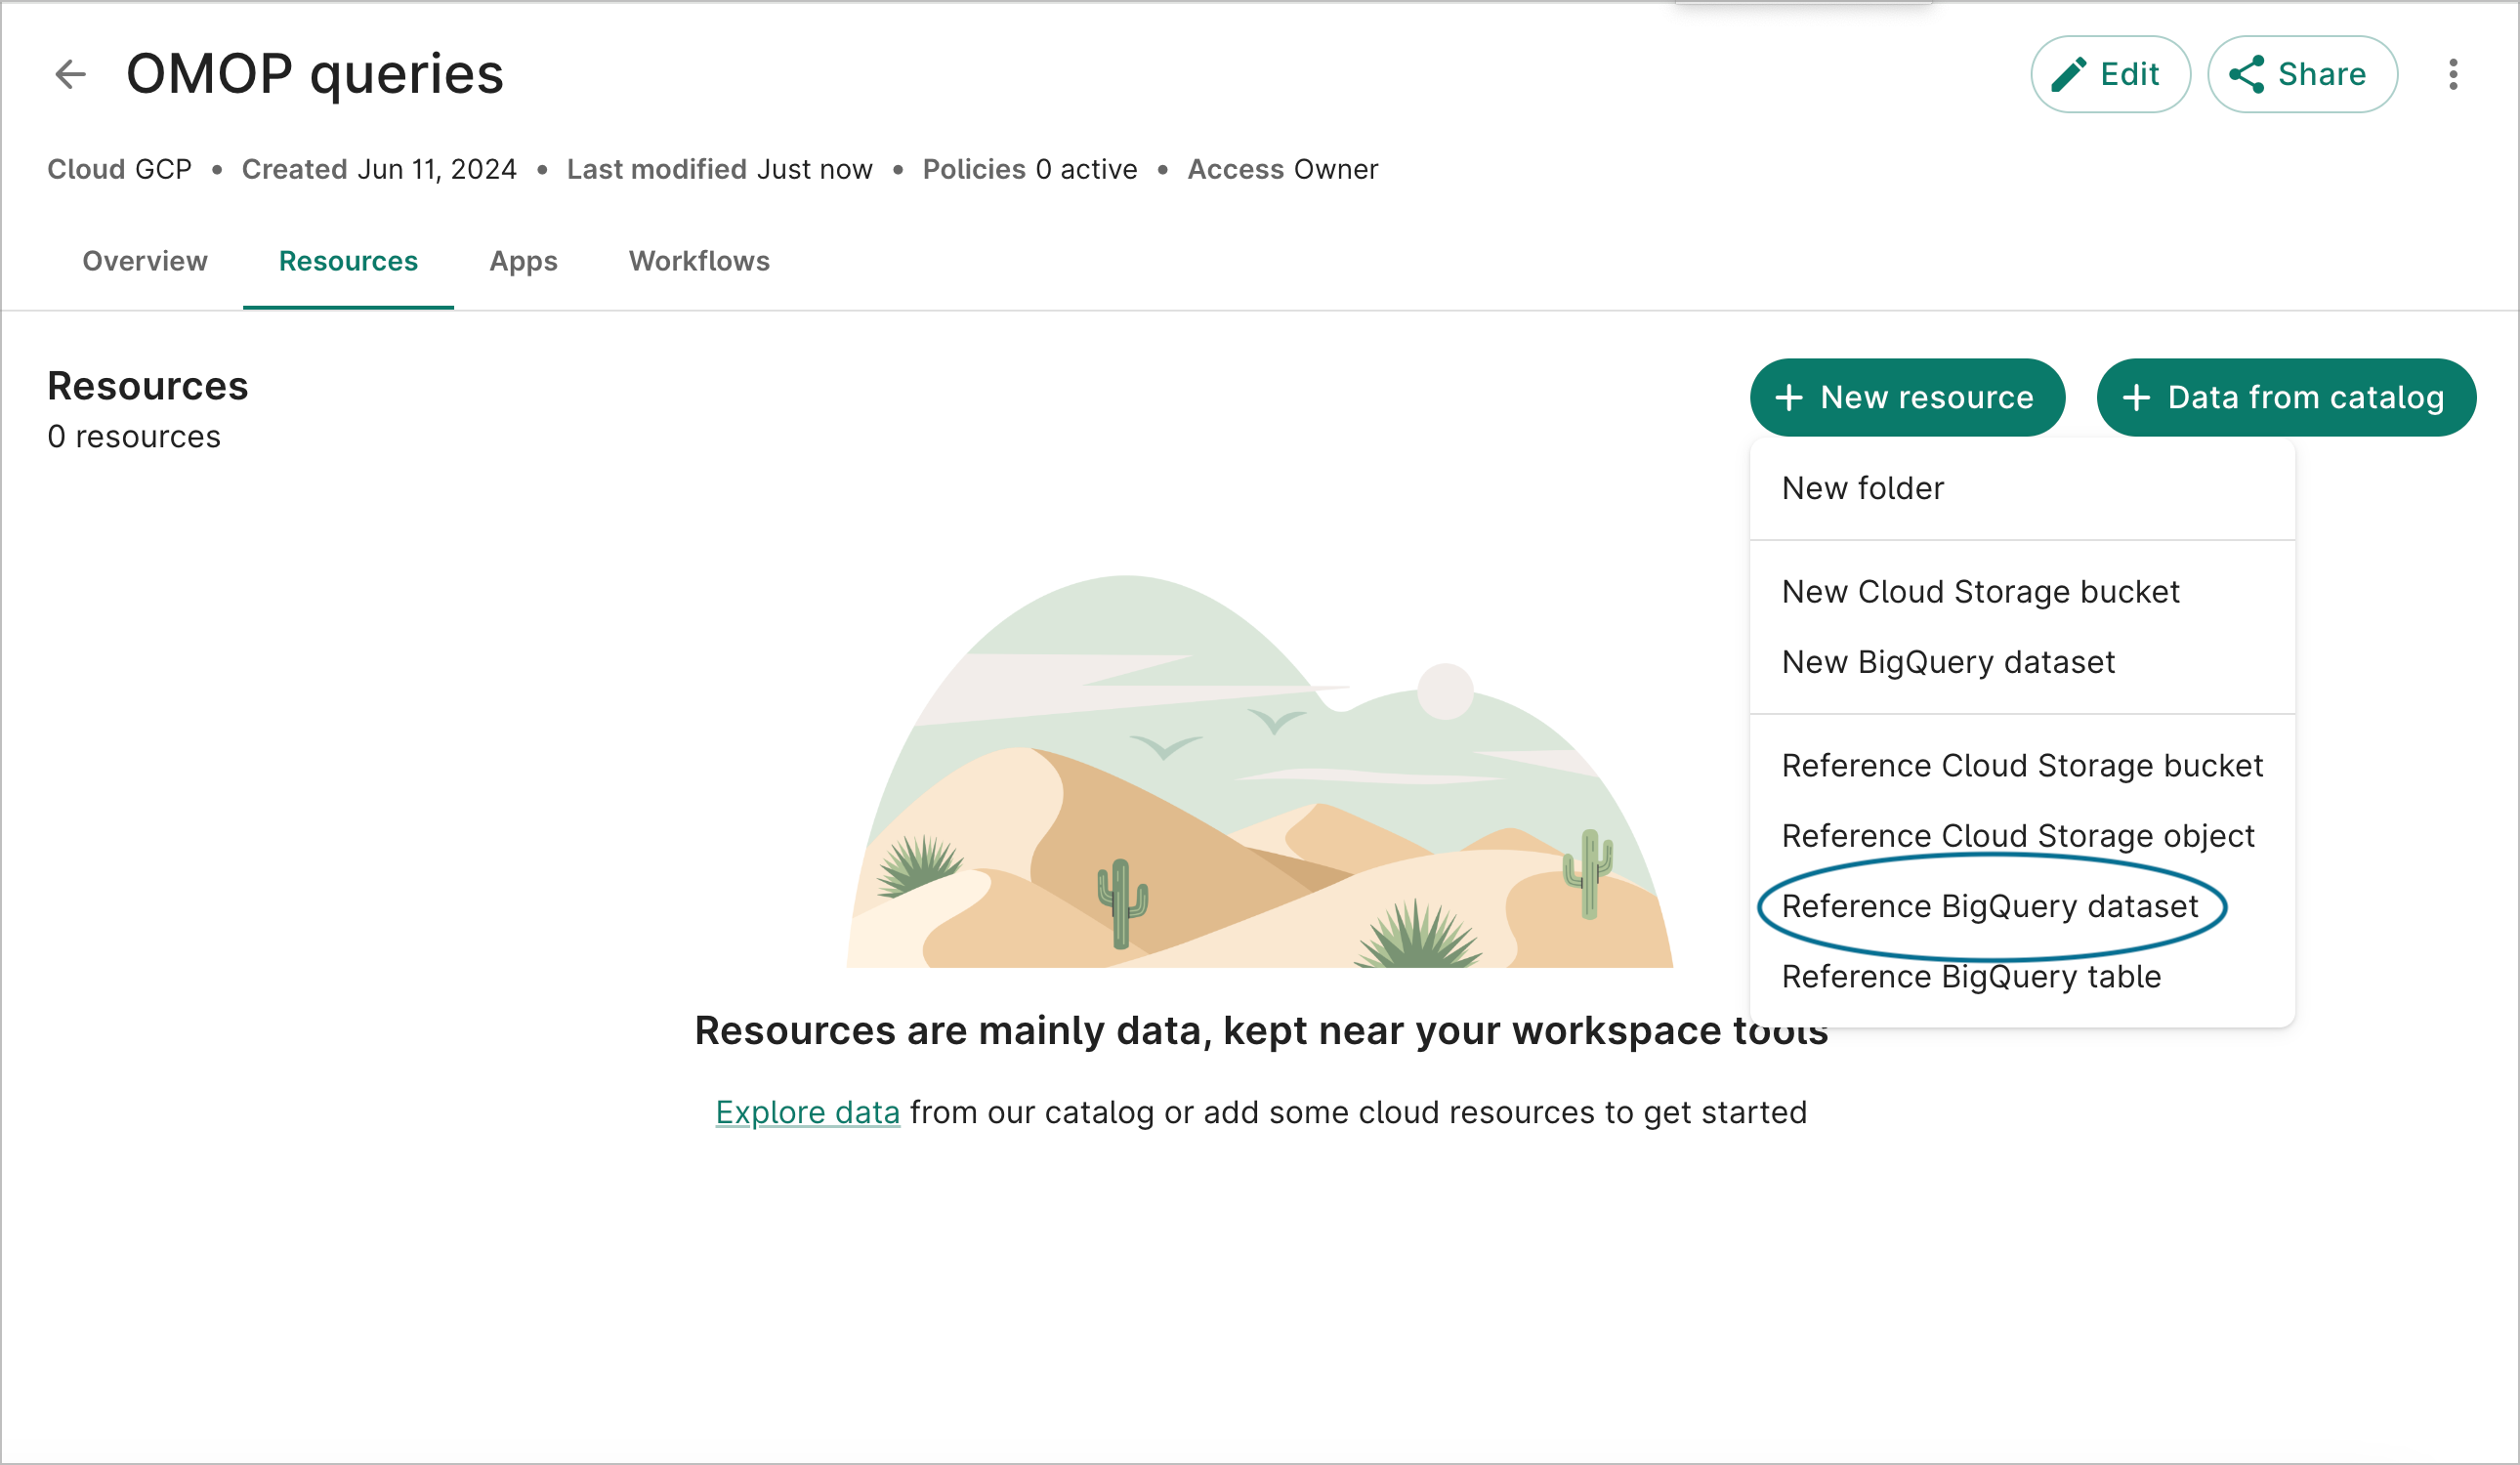
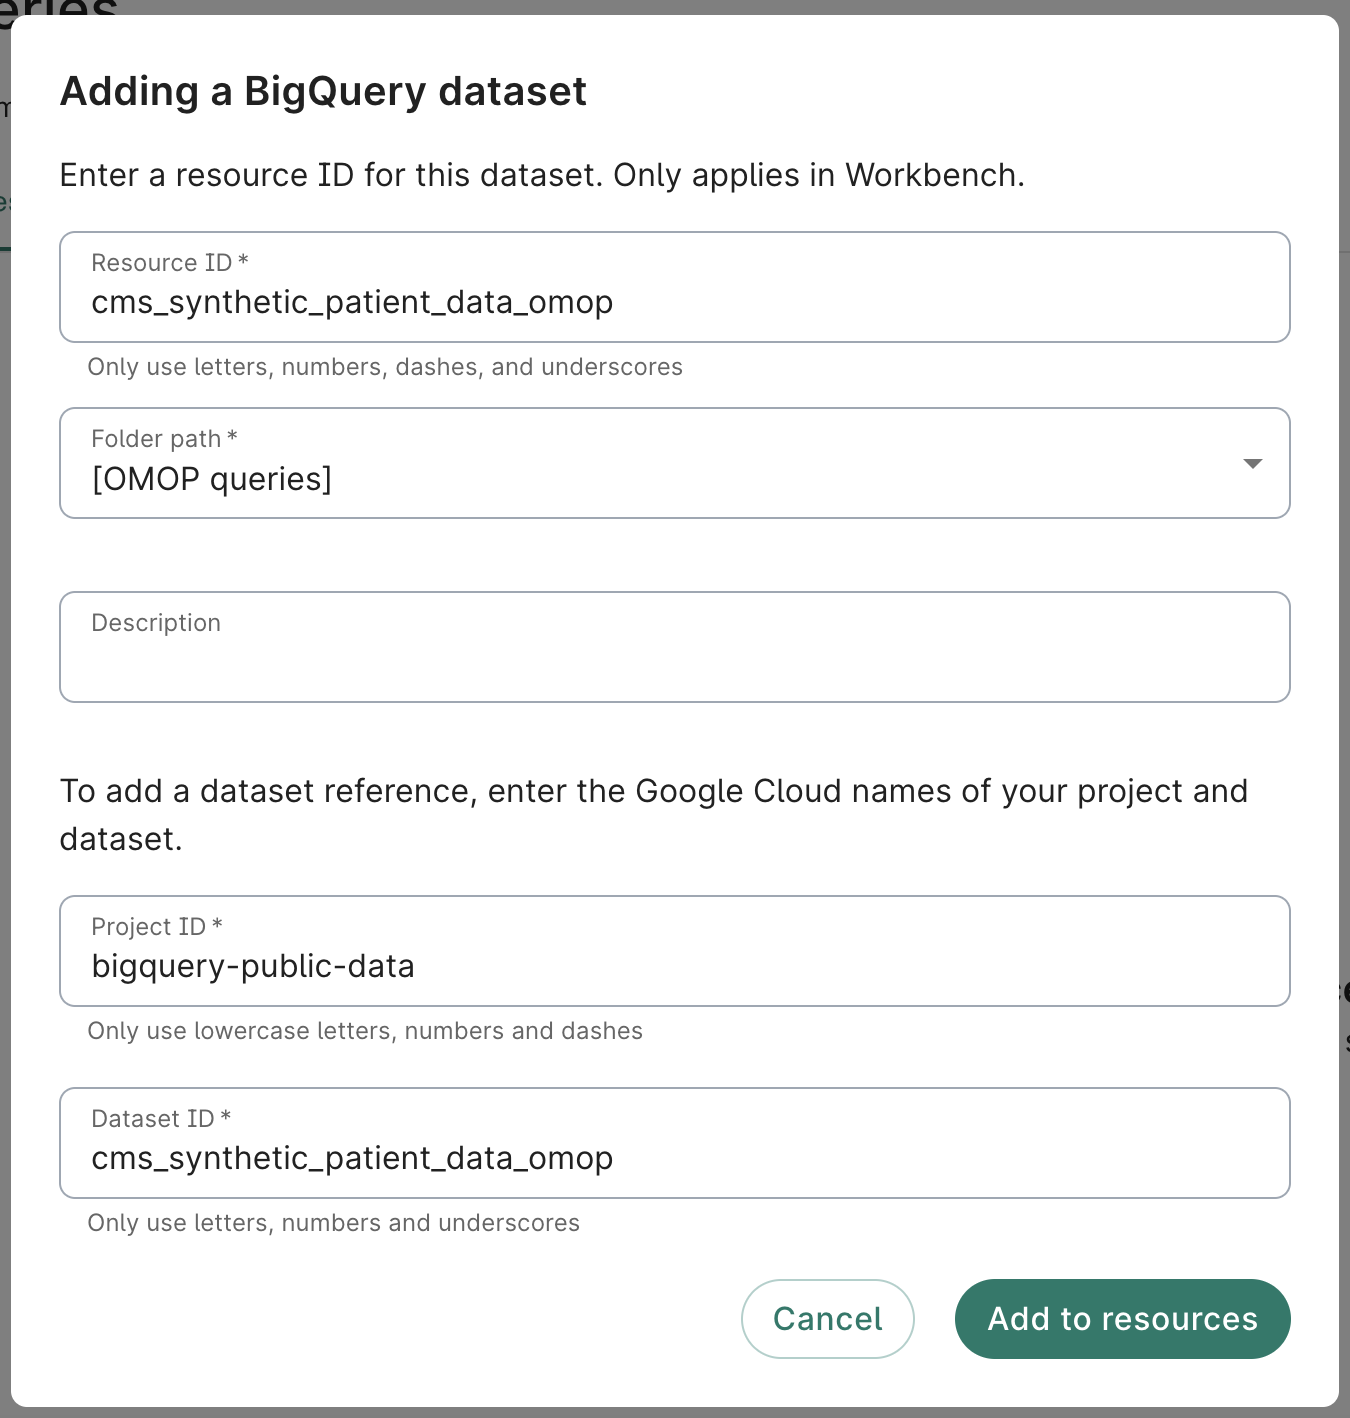
You can also define the referenced resource from using the wb command-line tool, as follows.
Here we're giving the resource the ID cms_synthetic_patient_data_omop, but you can name it what
you like.
wb resource add-ref bq-dataset --id cms_synthetic_patient_data_omop --path bigquery-public-data.cms_synthetic_patient_data_omop
Here is a convenience function to resolve a referenced resource, once defined. This function
assumes that the wb command-line tool is installed, which will be the case for workspace
notebook apps.
'''
Define a function to resolve a BQ dataset from a referenced resource in a workspace.
'''
def get_bq_dataset_from_reference(resource_id):
    BQ_CMD_OUTPUT = !wb resolve --id={resource_id}
    BQ_DATASET = BQ_CMD_OUTPUT[0]
    return BQ_DATASET
Connect to the BQ database
Before you run queries, instantiate a BigQuery client object configured for the CMS SynPuf dataset.
If you have created a referenced resource
as described above, you can resolve it using the convenience function as shown below. If not, set
BQ_dataset directly to the CMS dataset's URI.
# The following line resolves the workspace resource named cms_synthetic_patient_data_omop.
# It will fail if the named resource does not exist
BQ_dataset = get_bq_dataset_from_reference('cms_synthetic_patient_data_omop')
If you did not define a referenced resource, point to BQ_dataset to the dataset's URI
instead:
BQ_dataset = 'bigquery-public-data.cms_synthetic_patient_data_omop'
Then, instantiate the client object, setting the default_dataset:
job_query_config = bigquery.QueryJobConfig(default_dataset=BQ_dataset)
client = bigquery.Client(default_query_job_config=job_query_config)
Example query: history of skin conditions
The purpose of this example is to calculate the number of participants with a diagnosis of skin condition based on a list of ICD-10 codes. As a starting point for this study, we define the diagnosis of skin condition as a condition coded with an ICD-10 code from the following list:
L70.*: AcneL20.*: Atopic dermatitisL40.*: PsoriasisL80.*: Vitiligo
where "*" corresponds to any sequence of numbers.
For this purpose, it is necessary to perform the following steps:
-
Converting the ICD-10 codes of skin condition to concept IDs: This step consists of finding the concept IDs associated with the ICD-10 codes in the following list:
L70,L20,L40andL80. To do this, we will use theconcepttable of the OMOP vocabulary and find allconcept_codeequal to one of the ICD-10 codes for thevocabulary_idequal to "ICD10CM". See the CTEskin_condition_ICD_concept_idsin the SQL query below. -
Find the standard concept IDs linked to the ICD-10 concept IDs: The majority of conditions are coded with a standard concept ID (corresponding to a SNOMED code). Therefore, we need to find the standard concept IDs corresponding to the concept IDs previously extracted in step 1. The CTE
standard_concept_idsin the SQL query below consists of retrieving only the standard concept IDs from theconcepttable (i.e.,standard_conceptequal to "S") and the CTEskin_condition_standard_concept_idsconsists of mapping the concept IDs from step 1 to the standard concept IDs (i.e., using theconcept_relationshiptable withrelationship_idequal to "Maps to"). -
Find all concept IDs linked to the standard skin condition concept IDs: The dataset may also contain non-standard concept IDs. To ensure that we include patients who have a diagnosis of skin condition using a non-standard concept ID, we need to find all concept IDs associated with the core set of standard concept IDs identified in the previous step. To do this, we again use the
concept_relationshiptable, setting our standard concept IDs as concept_id_2 when using therelationship_idof "Maps to". We union these with our standard concept IDs to get a full set of skin condition concept_ids. See the CTEsskin_condition_nonstandard_concept_idsandskin_condition_all_concept_idsin the SQL query below. -
Find all the descendants of the skin condition concept IDs: The condition concept IDs are organized under an ontology with different levels of precision. Therefore, to capture all concept IDs for skin condition, we must also find all descendants of the concept IDs previously extracted in step 3. To do this, we will use the
concept_ancestortable with theancestor_concept_idequal to the concept IDs from step 3 and extract alldescendant_concept_idas the final listall_concept_ids_with_descendantsin the SQL query below. -
Calculate the number of participants with a diagnosis of skin condition: Finally, the last step is to extract and count the participants with at least one diagnosis of skin condition. We will use the
condition_occurrencetable and filter only the conditions coded with acondition_concept_idcorresponding to a concept ID of the previously extracted list. See the CTEnb_of_participants_diagnosed_with_skin_conditionin the SQL query below. -
Calculate the percentage of participants with a diagnosis of skin condition: Finally, the last step is to calculate the percentage with at least one diagnosis of skin condition out of the total number of participants. We will use the number of participants in the
persontable and calculate the percentage. See the CTEnb_total_of_participantsin the SQL query below.
query = """
    WITH skin_condition_ICD_concept_ids AS (
        SELECT
            concept_id,
            CASE concept_code
                WHEN 'L70' THEN 'Acne'
                WHEN 'L20' THEN 'Atopic dermatitis'
                WHEN 'L40' THEN 'Psoriasis'
                ELSE 'Vitiligo'
            END AS skin_condition
        FROM
            `concept`
        WHERE
            concept_code IN ('L70', 'L20', 'L40', 'L80')
            AND vocabulary_id = 'ICD10CM'
    ),
    standard_concept_ids AS (
        SELECT
            concept_id
        FROM
            `concept`
        WHERE
            standard_concept = 'S'
    ),
    skin_condition_standard_concept_ids AS (
        SELECT
            skin_condition,
            standard_concept_ids.concept_id
        FROM
            skin_condition_ICD_concept_ids
        INNER JOIN
            `concept_relationship`
        ON
            skin_condition_ICD_concept_ids.concept_id = concept_id_1
        INNER JOIN
            standard_concept_ids
        ON
            standard_concept_ids.concept_id = concept_id_2
        WHERE
            relationship_id = 'Maps to'
    ),
    skin_condition_nonstandard_concept_ids AS (
        SELECT
            skin_condition,
            concept_id_1 AS concept_id
        FROM
            `concept_relationship`
        INNE JOIN
            skin_condition_standard_concept_ids
        ON
            relationship_id = 'Maps to'
            AND concept_id_2 = concept_id
    ),
    skin_condition_all_concept_ids AS (
        SELECT DISTINCT
            skin_condition,
            concept_id
        FROM (
            SELECT
                *
            FROM
                skin_condition_standard_concept_ids
        ) UNION ALL (
            SELECT
                *
            FROM
                skin_condition_nonstandard_concept_ids
        )
    ),
    skin_condition_all_concept_ids_with_descendants AS (
        SELECT
            skin_condition,
            descendant_concept_id AS concept_id
        FROM
            skin_condition_all_concept_ids
        INNER JOIN
            `concept_ancestor`
        ON
            concept_id = ancestor_concept_id
    ),
    nb_of_participants_diagnosed_with_skin_condition AS (
        SELECT
            skin_condition,
            COUNT(DISTINCT person_id) AS nb_of_participants_with_skin_condition
        FROM
            `condition_occurrence`
        INNER JOIN
            skin_condition_all_concept_ids_with_descendants
        ON
            condition_concept_id = concept_id
        GROUP BY
            skin_condition
    ),
    nb_total_of_participants AS (
        SELECT
            COUNT(DISTINCT person_id) AS nb_of_participants
        FROM
            `person`
    )
    SELECT
        skin_condition,
        100*nb_of_participants_with_skin_condition/nb_of_participants AS percentage_of_participants,
    FROM
        nb_total_of_participants,
        nb_of_participants_diagnosed_with_skin_condition
"""
Execute the query
The code below will send a request to BigQuery to execute the query. The results will be stored in a Pandas dataframe.
df = client.query(query).result().to_dataframe()
df
Plot a visualization of the results
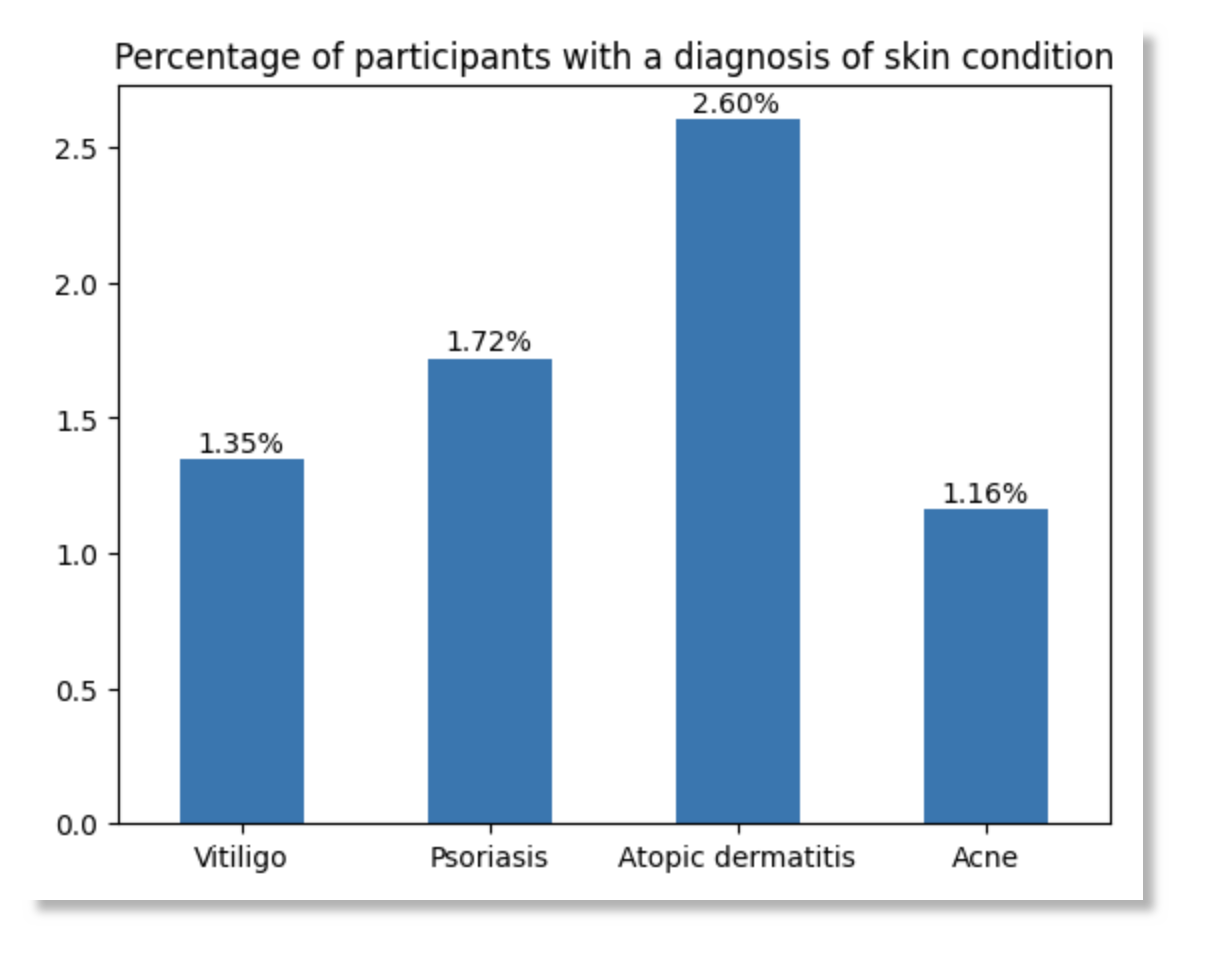
When run in a notebooks, the code below uses matplotlib to plot a simple histogram of the results.
ax = df.plot.bar(x='skin_condition', y='percentage_of_participants', title='Percentage of participants with a diagnosis of skin condition', rot=0, ylabel='', xlabel='', legend=False)
# Add bar labels
for p in ax.patches:
    ax.annotate('%.2f%%' % (p.get_height()), (p.get_x()+0.07, p.get_height()+0.03))
plt.show()
Example query: medications containing Quinapril
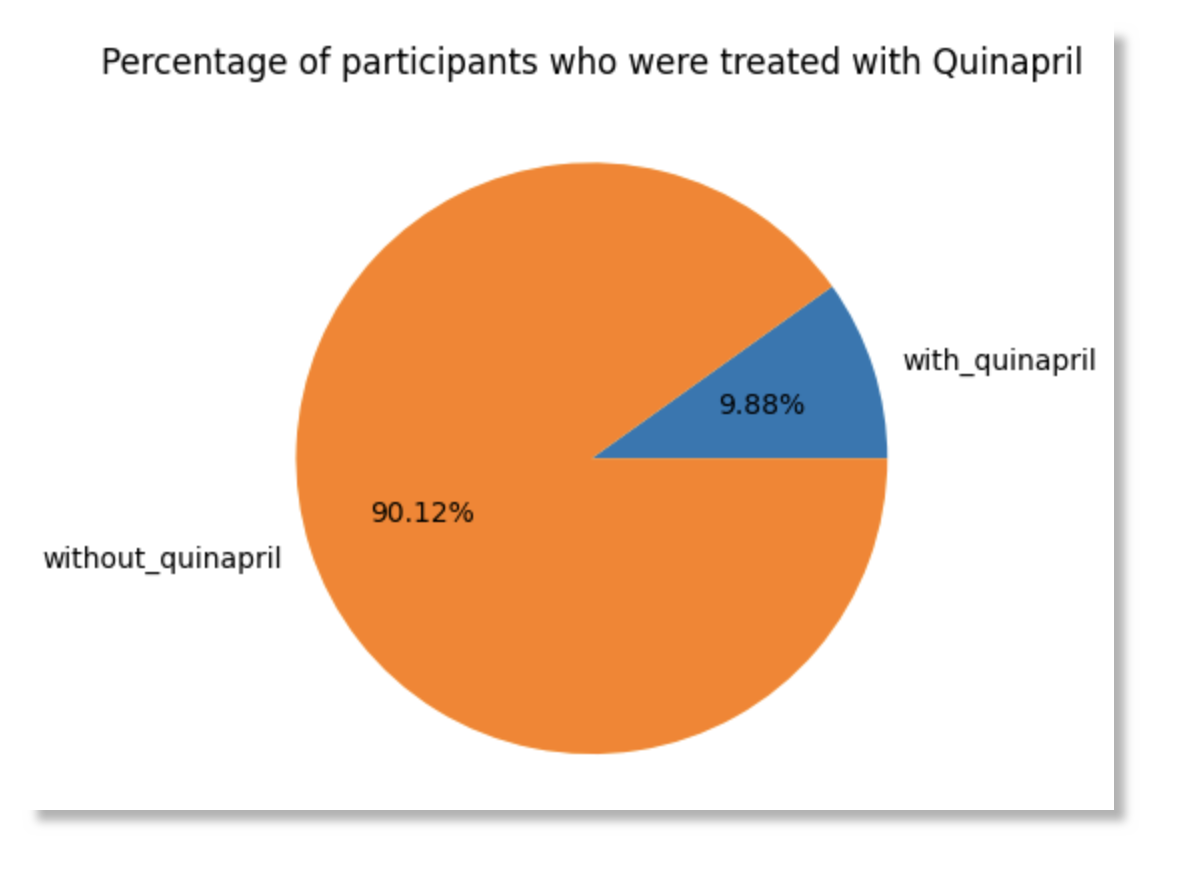
The purpose of this example is to calculate the number of participants who were treated with drugs containing the Quinapril molecule, a Beta Blocker. As a starting point for this study, we need to find the RxCUI code of the Quinapril molecule with the RxNav tool (https://mor.nlm.nih.gov/RxNav/search?searchBy=String&searchTerm=quinapril):
- Quinapril RxCUI:
35208
For this purpose, it is necessary to perform the following steps:
-
Converting the RxCUI code of Quinapril molecule to concept ID: This step consists of finding the concept ID associated with the
35208RxCUI code. To do this, we will use theconcepttable of the OMOP vocabulary and theconcept_codeequal to the RxCUI code for thevocabulary_idequal to "RxNorm". See the CTEquinapril_RxNorm_concept_idin the SQL query below. -
Find the drug standard concept IDs: Drugs are coded with a standard concept ID (corresponding to a RxNorm code). Therefore, We need to find the concept IDs linked to drugs containing the Quinapril molecule. The CTE
medications_with_quinaprilin the SQL query below consists of extracting all the descendants of the ingredient concept ID from step 1, which are all the drugs containing the Metropol ingredient. -
Find all drug concept IDs: Because some of the drugs may be coded using non-standard concept IDs, we recommend mapping the standard concept IDs identified in step 2 to obtain a comprehensive set of relevant concept IDs. This mapping is performed using the concept_relationship table of the OMOP vocabulary, where concept_id_2 is the standard concept ID(s) identified in step 1, and the relationship_id is 'Maps to'. See the CTE
all_medications_with_quinaprilin the SQL query below. -
Calculate the number of participants who were treated with Quinapril: The next step is to extract and count the participants with at least one Quinapril drug exposure. We will use the
drug_exposuretable and filter only the drugs coded with adrug_concept_idcorresponding to a concept ID of the previously extracted list. See the CTEnb_of_participants_treated_with_quinaprilin the SQL query below. -
Calculate the percentage of participants who were treated with Quinapril: Finally, the last step is to calculate the percentage who were treated with Quinapril out of the total number of participants. We will use the number of participants in the
persontable and calculate the percentage. See the CTEnb_total_of_participantsin the SQL query below.
query = """
    WITH quinapril_RxNorm_concept_id AS (
        SELECT
            concept_id
        FROM
            `concept`
        WHERE
            concept_code = "35208"
            AND vocabulary_id = "RxNorm"
    ),
    medications_with_quinapril AS (
        SELECT
            ancestor.descendant_concept_id AS concept_id
        FROM
            `concept_ancestor` AS ancestor
        INNER JOIN
            quinapril_RxNorm_concept_id AS quinapril
        ON
            ancestor.ancestor_concept_id = quinapril.concept_id
        INNER JOIN
            `concept` AS concept
        ON
            ancestor.descendant_concept_id = concept.concept_id
        WHERE
            concept.standard_concept = 'S'
    ),
    all_medications_with_quinapril AS (
        SELECT
            DISTINCT concept_id
        FROM (
            SELECT
                *
            FROM
                medications_with_quinapril
        ) UNION ALL (
            SELECT
                concept_id_1 AS concept_id
            FROM
                `concept_relationship`
            WHERE
                relationship_id = 'Maps to'
                AND concept_id_2 IN (
                    SELECT
                        concept_id
                    FROM
                        medications_with_quinapril
                )
        )
    ),
    nb_of_participants_treated_with_quinapril AS (
        SELECT
            COUNT(DISTINCT person_id) AS nb_of_participants_with_quinapril
        FROM
            `drug_exposure`
        INNER JOIN
            all_medications_with_quinapril
        ON
            drug_concept_id = concept_id
    ),
    nb_total_of_participants AS (
        SELECT
            COUNT(DISTINCT person_id) AS nb_of_participants
        FROM
            `person`
    )
    SELECT
        100*nb_of_participants_with_quinapril/nb_of_participants AS with_quinapril,
        100-(100*nb_of_participants_with_quinapril/nb_of_participants) AS without_quinapril,
    FROM
        nb_total_of_participants,
        nb_of_participants_treated_with_quinapril
"""
Execute the query
The code below will send a request to BigQuery to execute the query. The results will be stored in a Pandas dataframe.
df = client.query(query).result().to_dataframe()
df
Plot a visualization of the results
When run in a notebook, the code below uses matplotlib to plot a simple histogram of the results.
ax = df.transpose().plot.pie(y=0, autopct='%.2f%%', title='Percentage of participants who were treated with Quinapril', ylabel='', legend=False)
plt.show()
Build an interactive dashboard
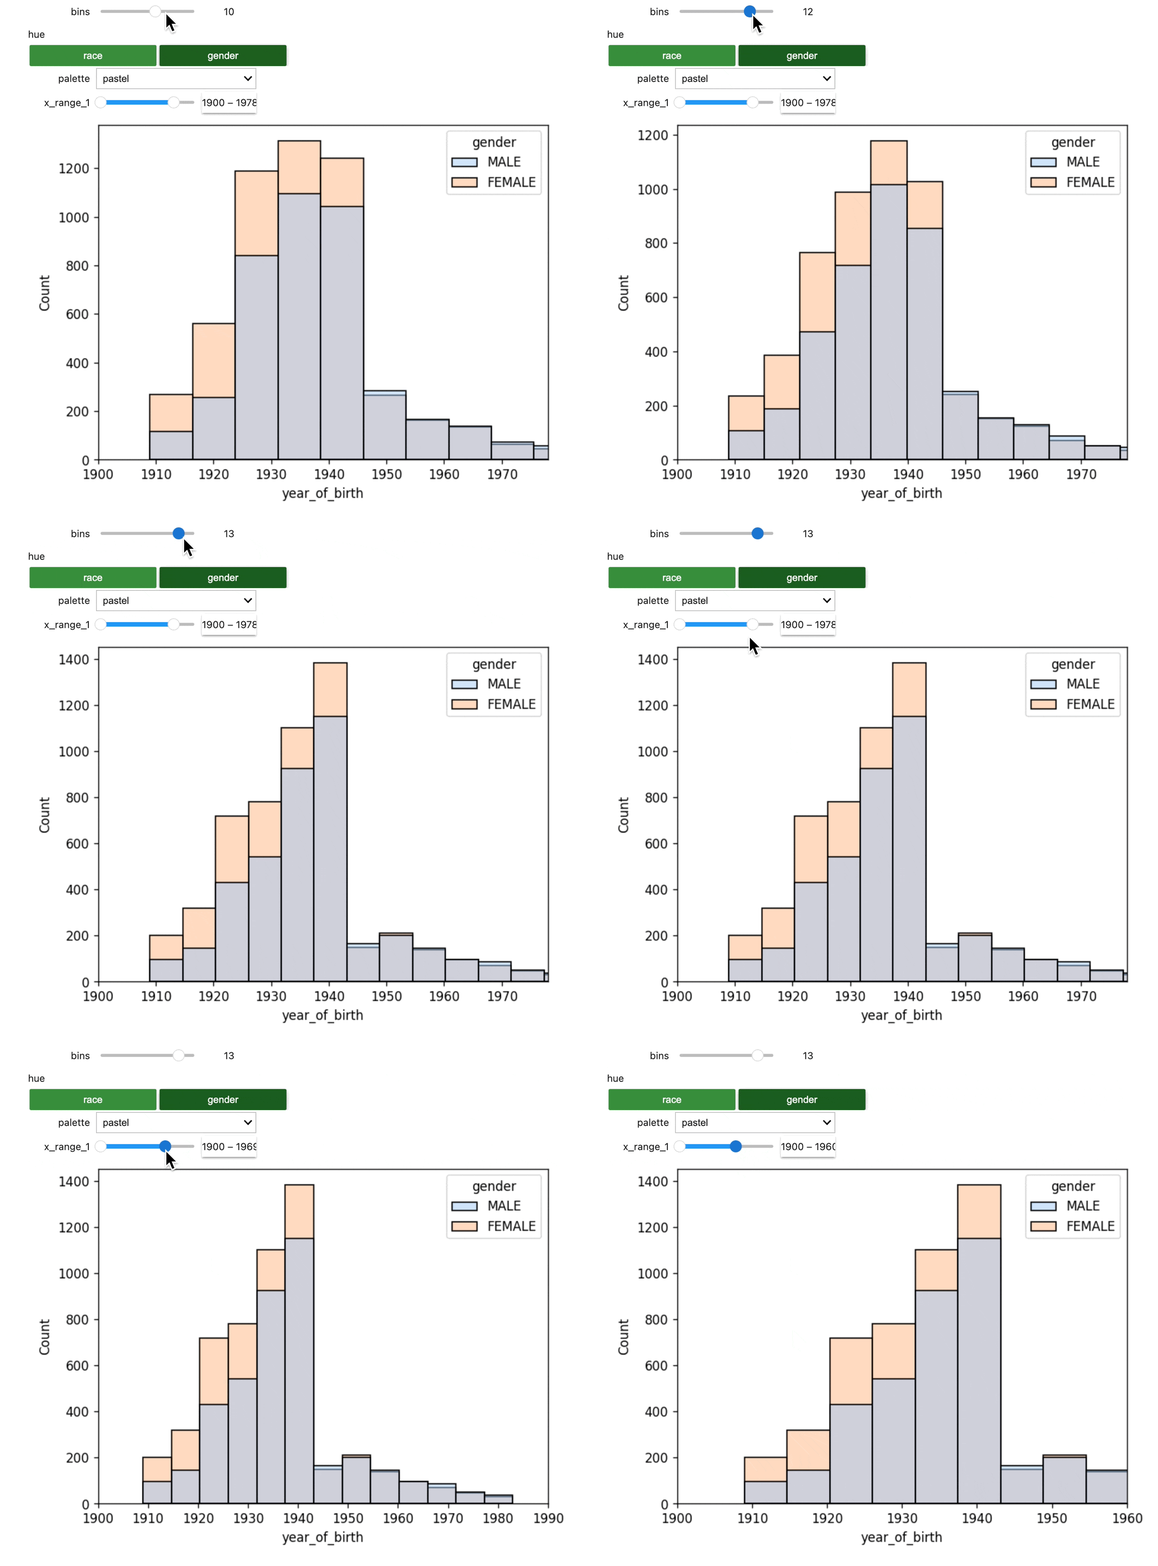
This example shows how you can build an interactive dashboard to help visualize your data. The code that creates the plot is meant to be run in a JupyterLab notebook.
We first make several queries to BigQuery, store the results in dataframes, and then merge the dataframes.
race_concept_query = """
SELECT concept_id as race_concept_id, concept_name as race FROM `concept` where domain_id = "Race"
"""
race_concept_df = client.query(race_concept_query).result().to_dataframe()
race_concept_df.head(5)
gender_concept_query = """
SELECT concept_id as gender_concept_id, concept_name as gender FROM `concept` where domain_id = "Gender"
"""
gender_concept_df = client.query(gender_concept_query).result().to_dataframe()
gender_concept_df.head(5)
people_query = """
SELECT
  person_id,
  race_concept_id,
  gender_concept_id,
  year_of_birth,
  month_of_birth
FROM
  `person`
WHERE RAND() < 10000/2326856
"""

cms_syn_df = client.query(people_query).result().to_dataframe()
cms_syn_df.head(5)
Merge the dataframes:
merged_df = pd.merge(cms_syn_df, race_concept_df, on="race_concept_id")
merged_df = pd.merge(merged_df, gender_concept_df, on="gender_concept_id")
merged_df.head(5)
Build an interactive dashboard
Next, we'll display the merged data via an interactive plot.
def plot_histogram(bins = 10, hue = 'race', palette = 'Blues', x_range_1 = (1900,2000)):
    plt.figure(dpi = 120)
    sns.histplot(data = merged_df,
                        x = 'year_of_birth',
                        palette=palette,
                        bins = bins,
                        hue = hue,
                       )
    plt.xlim(x_range_1)
_ = interact(
    plot_histogram,
    palette = widgets.Dropdown(
        options = ['pastel','husl','Set2','flare','crest','magma','icefire']
    ),
    hue = widgets.ToggleButtons(
        options = ['race','gender'],
        disabled = False,
        button_style = 'success'
    ),
    bins = widgets.IntSlider(
        value = 10,
        min = 3,
        max = 15,
        step = 1
    ),
    x_range_1 = widgets.IntRangeSlider(
        value = [1900,2000],
        min = 1900,
        max = 2000,
    ),
)
The dashboard should look like this:
Last Modified: 10 December 2024